The main 2 foot square sections are now completed. From the base dark brown they were given an all over dry brush of light stone colour to lighten the base a little before applying the next greens. I had a paint mixed at the DIY store as I could not find a green off the shelf to my liking - It was a Dulux Woodland Fern 1. This looks to my eye a very grass green colour. This was drybrushed fairly heavily across all the boards, but not too much to obliterate the browns showing beneath, this was left to dry overnight. The roads were given a heavy covering of the sandstone colour. Next up was adding a yellow highlight to green - this was a Dulux lemon pie colour , lightly applied a number of times to the main green area. The roads were given a lighter brush with a colour called natural calico.
The rocky areas were brushed with the natural calico, and the river was coloured with a middle blue, and again lightly brushed with the calico colour to pick out some of the plaster detail that had been brushed to give a water effect earlier.
The final bit was to to add a colour called buttercup yellow to the green areas in places.
So time to add some buildings & toys to it!
The main boards have been left probaby with more green than i had first planned , but then this will alow these to be used for other settings and collections. I will also be doing some more dusty terrain for the Sudan project next too , so I will be looking to make use of that for this collection as well.
The final layout of buildings will differ as there is still the the middle 1 foot wide sections to complete which will have the towns main street and also carry the the rail line. As these boards are small enough to be completed in the normal work room rather than the garage I will complete these over the winter.
These have been a pretty simple project - with little extra work on the base boards , such as carving rivers, and hill sections - more of that with the Sudan project.
Picking up those brushes again.
I will use the blog to record my creations & the odd occasion I actually do some gaming.
I have always been inspired by the aesthetic side of gaming. Playing on well constructed terrain using excellently painted units is always a joy.
Showing posts with label One man and his trowel. Show all posts
Sunday, 9 September 2012
Wednesday, 5 September 2012
Terrain -part 3 -WIP
Having left things to dry out fully for a couple of days it was time to take advantage of the warm day again yesterday, and get outside in the warmth. I applied some rocks made from
cat litter to the river section, and to some of the hill edges - just
to break things up a bit. Then I did an all over surface wash of thin plaster mix to harden the surface up. This was left to dry in the sun for a few hours. For the main areas -not the road/trails - I
applied PVA slightly thinned 50/50 with water and sprinkled on my sand/ballast mix, this
has been left to dry fully now for at least 24 hours.
Next was to apply the plaster work to the roads/trails and add some wheel ruts - do this as the plaster has started to harden by drawing a pencil, skewer etc into - make sure they join at any board intersections though. - and leave to harden fully overnight. Next day I gave the road areas a thin PVA wash to give more strength to the plaster. and then allow to dry . Hard work done now it's time for paint
I painted the sides of the polystyrene and the bottom of the MDF which will fully seal it, let it dry. Then using a SANDTEX FINE (masonary paint), bitter chocolate colour to cover the main areas. This added extra texture as well - which will be needed when it comes to drybrushing the lighter colours. I then used a lighter cocoa bean colour emulsion on the roads and trails - looks grey on the photos but that is the light tonight it dries different too.
So this is now being left to dry for 24 hrs , before applying greens and then further highlights.
Next was to apply the plaster work to the roads/trails and add some wheel ruts - do this as the plaster has started to harden by drawing a pencil, skewer etc into - make sure they join at any board intersections though. - and leave to harden fully overnight. Next day I gave the road areas a thin PVA wash to give more strength to the plaster. and then allow to dry . Hard work done now it's time for paint
I painted the sides of the polystyrene and the bottom of the MDF which will fully seal it, let it dry. Then using a SANDTEX FINE (masonary paint), bitter chocolate colour to cover the main areas. This added extra texture as well - which will be needed when it comes to drybrushing the lighter colours. I then used a lighter cocoa bean colour emulsion on the roads and trails - looks grey on the photos but that is the light tonight it dries different too.
So this is now being left to dry for 24 hrs , before applying greens and then further highlights.
Monday, 3 September 2012
Dry Goods Store
As I needed to leave time between processes with the terrain I also decided to get on with a recent addition to the buildings - a new piece by Sarrisa Precision.
It went together in under 10 minutes. Once the PVA had set , it was given a coat of Humbrol dark earth, and then I used a heavy dry brush of a Carmine Red, window frames were done in a cork brown colour. Some thinned flat red was used on the sign front to brighten it a little.
Also I had picked up a set of Renedra plastic tents - for the town edges - or the pox tents! ,these were undercoated a flat earth colour , given a brown wash and then just highlighted up with lighter browns. The telegraph poles were just given a spray of the brown and then given a drybrush in a sand colour. In addition they were mounted on 25mm washers to give a bit of weight too.
It went together in under 10 minutes. Once the PVA had set , it was given a coat of Humbrol dark earth, and then I used a heavy dry brush of a Carmine Red, window frames were done in a cork brown colour. Some thinned flat red was used on the sign front to brighten it a little.
Also I had picked up a set of Renedra plastic tents - for the town edges - or the pox tents! ,these were undercoated a flat earth colour , given a brown wash and then just highlighted up with lighter browns. The telegraph poles were just given a spray of the brown and then given a drybrush in a sand colour. In addition they were mounted on 25mm washers to give a bit of weight too.
Sunday, 2 September 2012
Terrain - part 2 - WIP
It's been a great weekend for terrain making, with probably the warmest days of the summer here by far - means the glue sets quickly!
So I had headed out into the garden to make a start. First up was to seal the MDF with a thin coat of neat PVA put on with a small roller. This cuts down on the dust from the stuff , and stops moisture absorption - which causes things to warp. I will give the finished result a thin coat of emulsion as well later. In the breeze and warmth the PVA took about an hour to dry off.
Next spread PVA as before over one side and affix the polystyrene.
I covered it with a piece of MDF and then added something heavy to press it down for a few minutes initially. Ice Cream sandwich anyone?
Repeat ......
Repeat.....
etc.
Now as Ray and Fran were not available I had to find something else to stack on top of the various layers. Of course you all have a bandsaw to hand don't you?- you don't.. Tish call yourself wargamers..
I piled things up as they came off the prodiuction line and at the end added extra weights - I knew those dumbbells would come in useful for something.
These were left overnight on a nice flat surface AKA the kitchen floor - Mr's D was not best pleased at my choice of location. - Memo to self must try harder to find somewhere better or at least pretend to find somewhere else next time.
So full of exictiment this morning I "volunteered" to make the breakfast. While it was cooking I laid them out on the dining room table (covered of course!) just to check alignment - all nice and flat and square! spot on.
Next job is to the strengthen the edges. So I ran masking tape around the sides, then an extra layer with half across the top and sides, any that had a bit of corner damge had extra masking tape put on.
This is pressed down using a small roller to press out any wrinkles and make sure it is attached all ok. This covers any bits of holes and dents etc. No Mr's D - just because i have been in the deocrating tools box does not mean one will be doing any soon!
Once this was done the masking tape had a layer of neat PVA appled and left to harden.
The basic road net was drawn on with a marker pen. What did the Romans do for us - roads - straight ones. So I will bend and wiggle these a little once the road plaster is applied.
Now you may notice a little problem with the bottom left board. Thanks to a strong stray gust of wind yesterday while dealing with last board it blew it away and smashed a corner of the last piece. So i am turning this piece into a river edge section with the road running down to the river at "Blue River Canyon" - I will make a new section later - but waste not want not.
I have added a few small raised areas from foamboard and run some plaster around the edges to smooth them (there is more work to do here yet)- just ordinary powder plaster wall filler.
So that is the main 2 foot square boards well on the way and the hard bits done. I have the middle section of 2 foot by 6 inches (or may be now a foot having looking at it) to do later which will have the railroad added to it.
Next job with these is to add plaster/pva/texture to main areas, and texture the roads - let it dry and then its ready for painting
So I had headed out into the garden to make a start. First up was to seal the MDF with a thin coat of neat PVA put on with a small roller. This cuts down on the dust from the stuff , and stops moisture absorption - which causes things to warp. I will give the finished result a thin coat of emulsion as well later. In the breeze and warmth the PVA took about an hour to dry off.
Next spread PVA as before over one side and affix the polystyrene.
I covered it with a piece of MDF and then added something heavy to press it down for a few minutes initially. Ice Cream sandwich anyone?
Repeat ......
Repeat.....
etc.
Now as Ray and Fran were not available I had to find something else to stack on top of the various layers. Of course you all have a bandsaw to hand don't you?- you don't.. Tish call yourself wargamers..
I piled things up as they came off the prodiuction line and at the end added extra weights - I knew those dumbbells would come in useful for something.
These were left overnight on a nice flat surface AKA the kitchen floor - Mr's D was not best pleased at my choice of location. - Memo to self must try harder to find somewhere better or at least pretend to find somewhere else next time.
So full of exictiment this morning I "volunteered" to make the breakfast. While it was cooking I laid them out on the dining room table (covered of course!) just to check alignment - all nice and flat and square! spot on.
Next job is to the strengthen the edges. So I ran masking tape around the sides, then an extra layer with half across the top and sides, any that had a bit of corner damge had extra masking tape put on.
This is pressed down using a small roller to press out any wrinkles and make sure it is attached all ok. This covers any bits of holes and dents etc. No Mr's D - just because i have been in the deocrating tools box does not mean one will be doing any soon!
Once this was done the masking tape had a layer of neat PVA appled and left to harden.
The basic road net was drawn on with a marker pen. What did the Romans do for us - roads - straight ones. So I will bend and wiggle these a little once the road plaster is applied.
Now you may notice a little problem with the bottom left board. Thanks to a strong stray gust of wind yesterday while dealing with last board it blew it away and smashed a corner of the last piece. So i am turning this piece into a river edge section with the road running down to the river at "Blue River Canyon" - I will make a new section later - but waste not want not.
I have added a few small raised areas from foamboard and run some plaster around the edges to smooth them (there is more work to do here yet)- just ordinary powder plaster wall filler.
So that is the main 2 foot square boards well on the way and the hard bits done. I have the middle section of 2 foot by 6 inches (or may be now a foot having looking at it) to do later which will have the railroad added to it.
Next job with these is to add plaster/pva/texture to main areas, and texture the roads - let it dry and then its ready for painting
Saturday, 1 September 2012
Terrain time
So I have buildings and figures, time for some terrain for Serenity Flatts. Having committed to taking this game on the road as a participation game next March at the Call to Muster Show time to crack on.
Now I could buy some - but nah! I enjoy the modelmaking part of this hobby probably the best. I have drawn up a plan to give me 8' x 4.5' layout. I have been to the local DIY store and picked up some 9mm MDF and 2" thick polystyrene insulation board - the helpful chaps cut it for me to 2' x 2' - they both came as 8'x4' sheets.
So it's off to the garden to make a start
Now I could buy some - but nah! I enjoy the modelmaking part of this hobby probably the best. I have drawn up a plan to give me 8' x 4.5' layout. I have been to the local DIY store and picked up some 9mm MDF and 2" thick polystyrene insulation board - the helpful chaps cut it for me to 2' x 2' - they both came as 8'x4' sheets.
The basic plan - drawn at 2 inches to the foot. The key point is that the road features leave at the middle of the 2' boards, and make it possible to change things aroun.
and with scaled buildings added from "post it's"
The basics - MDF & Poly
PVA and some tools
So it's off to the garden to make a start
Wednesday, 22 August 2012
The Bank
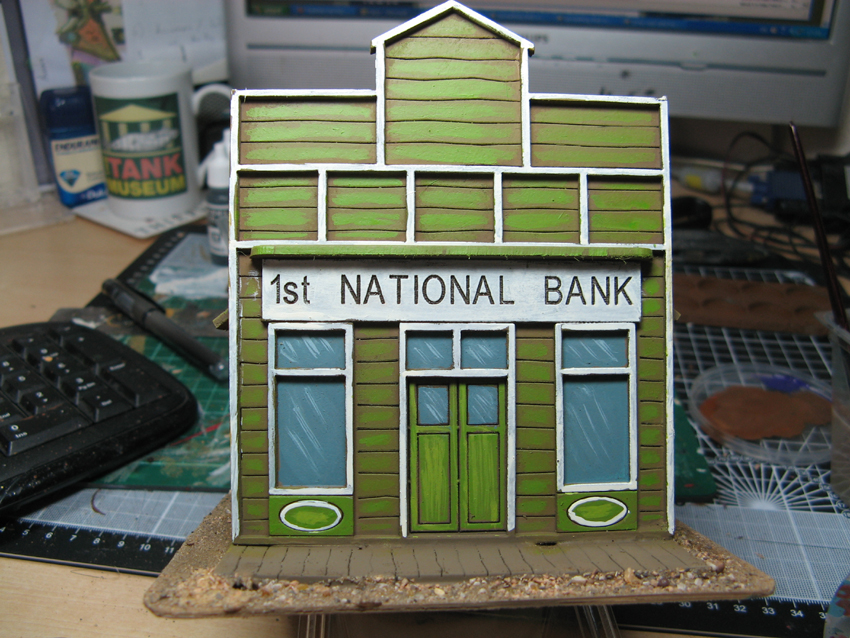
Well if you are going to have an attempted robbery - you need something to rob. So here is the bank. This was picked from Products for Wargamers . They do a range the same with different frontages. Its a 2mm laser cut MDF. I have left off the hitching posts for now as the boardwalks seem narrow - i intend to do some freestanding one for these buildings.
I was asked to do a walk through so here goes.
The completed building is given a spray of Humbrol Dark Earth I find it helps to seal things a bit and stop the MDF absorbing too much paint and gives a better surface to work on.
A light drybrsuh over the roof apex,edges and wall corners with Iraqi sand to give a bit of definition. Also added planking to rear of the frontage just using dark brown lines. Sepia wash is run around under the roof line and a thinned sepia wash added below the rear window and around the bottom of the walls. So now it just needs the base colour doing and a spray of matt varnish.
It can take it's place in the collection along with the Gunsmith done at the same time
5 buildings done in the week not a bad output!
First shot of them all together - just on the dining table - some custom baseboards planned for later in the year.
Game on for the weekend
I was asked to do a walk through so here goes.
The completed building is given a spray of Humbrol Dark Earth I find it helps to seal things a bit and stop the MDF absorbing too much paint and gives a better surface to work on.
Next it was given a heavy drybrush of Khaki Grey a nice green - brown colour for a base with a large brush
This is not worked fully into the corners of detail as these are left darker
I used a Golden Olive Green to paint in a deeper stronger colour on some areas
The window panes were added with a blue grey , and then a little white added and the middle of the panes highlighted
Some light reflection in lighter grey added to the panes , and framework detail picked out in an Ivory colour
The planking is done with a 50/50 water / paint mix and painted in to the centre of the planks - this look bright when first done but as it dries it darkens
The same 50/50 technique is used to create the tiles on the roof
You can see from this shot the differnece as it dries.
The board walk is done with two lighter browns using the 50/50
Hand painted signage is added
A light drybrsuh over the roof apex,edges and wall corners with Iraqi sand to give a bit of definition. Also added planking to rear of the frontage just using dark brown lines. Sepia wash is run around under the roof line and a thinned sepia wash added below the rear window and around the bottom of the walls. So now it just needs the base colour doing and a spray of matt varnish.
It can take it's place in the collection along with the Gunsmith done at the same time
5 buildings done in the week not a bad output!
First shot of them all together - just on the dining table - some custom baseboards planned for later in the year.
Game on for the weekend
Monday, 20 August 2012
The "Meat Co"
I enjoyed doing the scratch build on the Ranch so much I wanted to do some more. So here we have the towns "Meat Co" . It's a 5mm foam board construction with 2mm balsa cladding . Windows are a set from Antenocitis , doors were made from balsa. I had picked up some bits for this at a recent railway show - a find of pigs and chickens for the back of the shop
It was coloured using a dark grey base and then given successive dry brush distressing using a middle grey grey and finished of with bit of Vallejo Iraqi Sand to give it bit of warmth. Really please with the end result
I had some foam board off cuts left over , so waste not want not they say, I turned them into a simple adobe walls construction - this should double up ok for Old West and the Sudan I think. This was a simple bit of work. I added some odd bit's of plasicard brick left over from the chimney of the ranch and then gave the whole thing a coat with a powder plaster filler & little sand mix put on with a palette knife. Once It was dry it was given a PVA wash to give it extra strength and coloured with a natural calico emulsion (Dulux) picked up at the DIY store , and given a top drybrush of pure white.
It was coloured using a dark grey base and then given successive dry brush distressing using a middle grey grey and finished of with bit of Vallejo Iraqi Sand to give it bit of warmth. Really please with the end result
I had some foam board off cuts left over , so waste not want not they say, I turned them into a simple adobe walls construction - this should double up ok for Old West and the Sudan I think. This was a simple bit of work. I added some odd bit's of plasicard brick left over from the chimney of the ranch and then gave the whole thing a coat with a powder plaster filler & little sand mix put on with a palette knife. Once It was dry it was given a PVA wash to give it extra strength and coloured with a natural calico emulsion (Dulux) picked up at the DIY store , and given a top drybrush of pure white.
Also got all the Old West foot figures together for a shot.
First play test planned for the bank holiday weekend,
and just noticed this is the 100th post!
BLIMEY!
Subscribe to:
Posts (Atom)